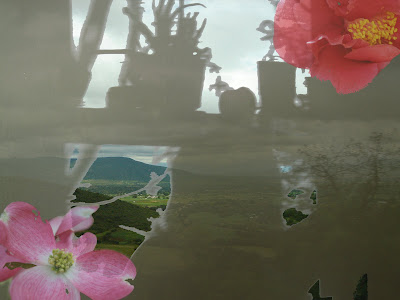


Instructions for making a photomontage using the magic wand tool & lasso tool
1. Open Photoshop
2. Open your image by going to the File menu and selecting Open.
3. Choose File and click Open
(repeat steps 2 and 3 to open the additional files)
4. Make sure the Layers Palette is visible, if not go to Window - > Layers
(The mountain landscape image will be your background layer. You will be using the Magic Wand Tool and the Lasso Tool to add selections from the other images on top of the background layer).
Add the 1st selection:
5. Select the Magic Wand Tool from the Tool Palette (the wand, keyboard shortcut is the letter W)
6. Set the tolerance for the wand at 60 (located in the upper panel). Choose the shadow picture.
Click the darker area of the shadow picture. The shadow will be selected.
7. Use the keyboard shortcut CNTRL + C or Command + C to copy the selection.
8. Click on the background image (mountain landscape image).
9. Use the keyboard shortcut CNTRL + V or Command + V to paste the selection.
10. Use Free Transform (CNTRL + T or Command + T) to adjust the size of the selection. Click and drag the corners out to change the size. Hit the ENTER/RETURN key to apply the transformation.
11. Select the Move Tool from the Tool Palette (it looks like an arrow and the shortcut is the letter V).
Use the Move Tool to change the placement of the top layer.
12. Adjust the Opacity of the top layer in the Layers Palette by selecting the top layer and then dragging the opacity slider to the left.
Add the 2nd selection:
13. Click on image of the dogwood flower.
14. Select the Magic Wand Tool from the Tool Palette (the wand, keyboard shortcut is the letter W)
15. Set the tolerance for the wand at 80 (located in the upper panel). Click on the flower with the magic wand.
16. Use the Lasso Tool (looks like a lasso, keyboard shortcut is the letter L) to increase of decrease the selection. Shift + click and circle areas to add them to the selection. Alt + click and circle areas to detract them from the selection.
16. Use the keyboard shortcut CNTRL + C or Command + C to copy the selection.
17. Click on the background image.
18. Use the keyboard shortcut CNTRL + V or Command + V to paste the selection.
19. Use Free Transform (CNTRL + T or Command + T) to adjust the size of the selection. Click and drag the corners out to change the size. Hit the ENTER/RETURN key to apply the transformation.
19. Select the Move Tool from the Tool Palette (it looks like an arrow and the shortcut is the letter V).
Use the Move Tool to change the placement of the selection.
20. Adjust the Opacity of the top layer in the Layers Palette by selecting the top layer and then dragging the opacity slider to the left.
Add the 3rd selection:
21. Click on image of the red flower.
22. Select the Magic Wand Tool from the Tool Palette (the wand, keyboard shortcut is the letter W)
23. Set the tolerance for the wand at 80 (located in the upper panel). Click on the flower with the magic wand.
24. Use the Lasso Tool (looks like a lasso, keyboard shortcut is the letter L) to increase of decrease the selection. Shift + click and circle areas to add them to the selection. Alt + click and circle areas to detract them from the selection.
25. Use the keyboard shortcut CNTRL + C or Command + C to copy the selection.
26. Click on the background image.
27. Use the keyboard shortcut CNTRL + V or Command + V to paste the selection.
28. Use Free Transform (CNTRL + T or Command + T) to adjust the size of the selection. Click and drag the corners out to change the size. Hit the ENTER/RETURN key to apply the transformation.
29. Select the Move Tool from the Tool Palette (it looks like an arrow and the shortcut is the letter V).
Use the Move Tool to change the placement of the selection.
30. Adjust the Opacity of the top layer in the Layers Palette by selecting the top layer and then dragging the opacity slider to the left.
Save the image:
31. Save your image by going to the File menu and Save As (Choose JPEG for finished images and PSD for unfinished images). For JPEG save the image at the highest size (Size 12).
***REMEMBER YOU CAN ALWAYS GO BACKWARDS ONE STEP WITH THE KEYBOARD SHORCUT CONTROL + Z or COMMAND + Z***