Sunday, March 20, 2011
Paint Brush, Paint Bucket, Eye Dropper, Default colors Move, Blur, Sharpen, Smudge, Merge Down, Merge Visible, Flatten Image, Filters
Paint Brush, Paint Bucket, Eye Dropper, Default colors
Move, Blur, Sharpen, Smudge, Merge Down, Merge Visible, Flatten Image, Filters
(After right-clicking the image from the blog and saving it to your desktop)
1. Open Photoshop (From your Start Menu > Programs > Adobe CS2)
2. Open your image by going to the File menu and selecting Open.
3. Choose File and click Open
4. Make sure the Layers Palette is visible, if not go to Window > Layers
5. Copy your background using the keyboard shortcut CNTRL + J (Command J)
Levels
6. With the Background Copy Highlighted, Click on the Cookie and choose Levels.
7. Drag the midtones triangle to 0.75 and Click OK.
8. With the Levels Layer highlighted Click CNTRL + E (Command E) to merge down.
Paint Bucket Tool
9. Click on the Paint Bucket Tool (keyboard shortcut is G).
10. Set the Mode to Clear. Set the Opacity to 90% and the Tolerance to 20. Uncheck “All Layers”.
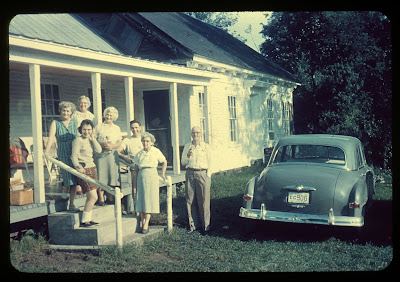
11. Click on the shadow area next to the car, on the left side.
12. Click on other dark areas like the trees.
Eye Dropper
13. Click on the Eye Dropper Tool (keyboard shortcut is I). Click on the shadow areas of the porch railing to select a light gray color.
Paint Bucket Tool
14. Click on the Paint Bucket Tool (keyboard shortcut is G).
15. Set the Mode to Darken. Set the Opacity to 45% and the Tolerance to 20. Uncheck “All Layers”.
16. Click on the highlight area on the porch railing to bring down the highlights.
Magic Wand
17. Click on the Background Copy and Click on the Magic Wand (keyboard
shortcut is W).
18. Set the Magic Wand Tolerance to 20. Click on the highlight areas on the shirts and on the side of the house.
19. With the Background Copy Highlighted, Click on the Cookie and choose Brightness/Contrast. Drag the Brightness down to -8 and the Contrast to -18.
20. With the Brightness/Contrast Layer highlighted Click CNTRL + E (Command E) to merge down.
Eye Dropper
21. Click on the Eye Dropper Tool (keyboard shortcut is I). Click on the non-shadowy part of the skirt of the woman in the middle.
Brush Tool
22. Click on the Paint Brush (keyboard shortcut is B)
23. Set the Mode to Normal. Opacity = 36%. Flow = 75%. Hardness = 25%
24. Zoom in onto the skirt of the woman in the middle. Gradually paint over the shadow with the Paint Brush, varying the sizes of the brush as you go. Use the keyboard shortcuts to change the size of the brush (right bracket = larger and left bracket = smaller).
Smudge
25. Use the smudge tool (keyboard shortcut is R) to make the skirt area look more natural and to smooth over some of the dust and scratches.
26. Use the sharpen tool to add contrast to detail areas like eyes and hair, as well as on geometric lines like the window frame.
27. Use the blur tool to smooth out the edges of the frame.
Snapshot
28. Click on the History Palette and click on the icon of the camera at the bottom to make a snapshot of the image.
Flatten Image
29. Click on the Layers Palette, Click on the triangle at the top right and select Flatten Image in the drop down menu.
Filters
30. Copy your background using the keyboard shortcut CNTRL + J (Command J)
31. Go to the Filter Menu > Filter Gallery . . .
32. Open the drop down menus by clicking the triangles
33. Choose a filter and adjust the sliders to modify the effect
34. Click OK to commit the changes.
THE END