Tuesday, March 15, 2011
working with selections
working with selections
(After right-clicking the image from the blog and saving it to your desktop)
1. Open Photoshop (From your Start Menu > Programs > Adobe CS2)
2. Open your image by going to the File menu and selecting Open.
3. Choose File and click Open
4. Make sure the Layers Palette is visible, if not go to Window > Layers
5. Copy your background using the keyboard shortcut CNTRL + J (Command J)
Threshold
Before we make any changes to the image let's look at the dark and light points with Threshold.
Click on the Background Copy and then click on the Cookie and select Threshold.
Adjust the slider from right to left to see the darkest and lightest points of the image.
Keep these in mind when you are adjusting levels and contrast.
Levels
6. Click on the Cookie and select Levels. Drag the Black & White sliders to the bottom edges of the histogram. Adjust the Gray slider as you choose.
7. Click CNTRL + E (Command + E) to Merge Down (Or choose Merge down from the Layers Palette Menu).
Magic Wand
8. Click on the Background Copy and Click on the Magic Wand (keyboard shortcut is W).
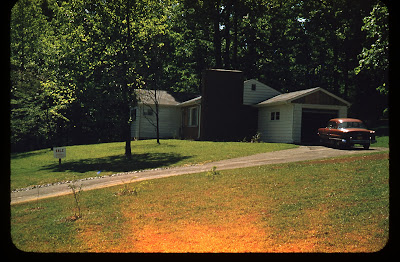
9. Set the Magic Wand Tolerance to 40. Select the red area of the grass in the bottom of the photo by clicking on it with the Magic Wand. You can add additional areas with shift+click. Feather the selection by 10 pixels (either Right Click > Feather or Refine Edge > Feather).
Hue / Saturation
10. Click on the Cookie and select Hue/Saturation. From the Edit drop down menu choose Reds and adjust the Hue and the saturation sliders to decrease the reds in that area. Click OK.
Invert
11. Click on the Background Copy and Click on the Marquee Tool.
12. Use the Marquee Tool to select the sale sign.
13. Click on the Cookie and select Invert.
Curves
14. Use the Magnetic Lasso Tool to select the house.
15. Click on the Background Copy then Click on the Cookie and select Curves. Use the 3-point system to increase the contrast. Click OK.
Copy and Paste Selection
20. Use the Magnetic Lasso Tool to select the Car. Feather the selection 5 pixels.
21. Copy (CNTRL + C or Command + C) and then Paste the selection (CNTRL + V or Command + V).
22. Use Free Transform (CNTRL + T or Command + T) to flip the direction of the car and then move it so that it is coming up the driveway.
23. Click on the Cookie and select Hue/Saturation. From the Edit drop down menu choose Reds and adjust the Hue slider to change the color of the car. Click OK.
24. Click CNTRL + E (Command + E) to Merge Down (Or choose Merge down from the Layers Palette Menu). You will see that the Hue adjustment now only affects the car.
Flatten Image, Sponge, Brightness/Contrast
25. Choose Flatten Image from the Layers Palette Menu
26. Copy your Background and click on the Background Copy.
27. Choose the Sponge and set it to Desaturate Mode at 65%. Click on the Red areas to desaturate them.
28. Click on the Cookie and Choose Brightness/Contrast to adjust the overall finished image.
29. Set the default colors (D) and flip them (X) to get black as your background color. Use the crop tool to extend the border at the top. Click and drag the crop marquee outside the edge of the top side of the picture. Click Enter.
The End.